Laser Rangefinder LDL-T → Companion Computer → Pixhawk Flight Controller: A Pixhawk Integration Guide
In the world of drone technology and autonomous systems, integrating precise range data is paramount to achieving reliable navigation and obstacle avoidance. The laser rangefinder LDL-T is one such sensor that provides accurate distance measurements, and when paired with a companion computer and a Pixhawk flight controller, it creates a robust system capable of advanced flight behaviors. This article serves as a comprehensive Pixhawk Integration Guide, explaining how to connect the laser rangefinder LDL-T through a companion computer to a Pixhawk flight controller, enabling enhanced drone performance.
Understanding the Components: LDL-T, Companion Computer, and Pixhawk
Before diving into the integration process, it’s essential to understand the role each component plays:
-
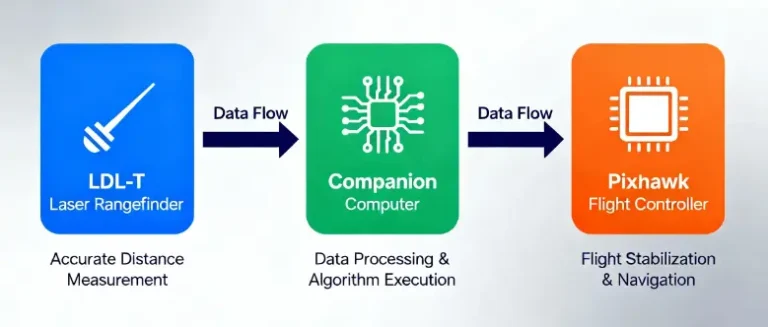
Laser Rangefinder LDL-T: This sensor uses laser technology to measure the distance between the sensor and an object by timing the reflection of a laser pulse. Its accuracy and real-time output make it ideal for altitude measurement and obstacle detection.
-
Companion Computer: Acting as an intermediary, the companion computer processes data from sensors like the LDL-T, executes complex algorithms, and communicates with the flight controller. Popular boards include the Raspberry Pi, NVIDIA Jetson Nano, and Intel NUC.
-
Pixhawk Flight Controller: This is the central processing unit of the drone responsible for flight stabilization, navigation, and executing commands. It receives data from sensors and the companion computer to control the drone’s motors and flight behavior.
Why Use a Companion Computer in the Integration?
Directly connecting the LDL-T laser rangefinder to Pixhawk is possible but often limited. The UART or I2C ports on Pixhawk have bandwidth and protocol constraints, and processing raw sensor data onboard can be challenging. Using a companion computer offers several advantages:
-
Data Processing: The companion computer can filter, transform, or fuse sensor data for better accuracy.
-
Complex Computation: Running perception algorithms like SLAM, obstacle avoidance, or mapping is more efficient on the companion computer.
-
Flexibility in Communication: The companion computer can format sensor outputs (e.g., MAVLink messages) compatible with Pixhawk.
Pixhawk Integration Guide: Step-by-Step Connection of LDL-T Via Companion Computer
Step 1: Wiring the LDL-T to the Companion Computer
The LDL-T typically communicates using UART serial or I2C protocols. Check the sensor documentation to confirm your model’s interface.
-
For UART: Connect the LDL-T’s TX (transmit) pin to the companion computer’s RX (receive) pin, RX to TX, plus GND and power lines (usually 5V or 3.3V depending on the sensor).
-
For I2C: Connect SDA and SCL lines to the companion computer’s I2C bus, along with power and ground. Use level shifters if voltage levels differ.
Ensure secure connections and, if needed, use a logic analyzer or serial terminal software to verify that the companion computer receives valid data from the LDL-T sensor.
Step 2: Processing the LDL-T Data on the Companion Computer
Once the connection is verified, the next step involves writing or deploying software on the companion computer to read and process laser range data:
-
Use programming languages like Python, C++, or ROS nodes to parse the sensor’s output.
-
Apply filtering algorithms such as median or Kalman filters to smooth noisy readings.
-
Format the sensor data into messages understandable by the Pixhawk, commonly using the MAVLink protocol.
Specialized modules like the Robot Operating System (ROS) can facilitate data fusion and communication when working on sophisticated projects.
Step 3: Configuring Communication Between Companion Computer and Pixhawk
Communication between the companion computer and the Pixhawk flight controller usually occurs via a telemetry port through UART.
-
Connect the companion computer’s UART port to Pixhawk’s TELEM or SERIAL port, matching TX to RX and RX to TX, with shared ground.
-
Configure the Pixhawk to accept external sensor data by enabling the respective MAVLink stream and setting parameters for distance sensor input.
-
On the companion computer, run a MAVLink node or script that continuously sends processed LDL-T distance data as distance_sensor messages.
This two-way communication allows Pixhawk to incorporate real-time altitude or obstacle distance information directly into its flight logic.
Step 4: Verifying Data Integration on Pixhawk
After establishing communication, verify that data from the LDL-T is received correctly on the Pixhawk:
-
Use ground control station software (e.g., QGroundControl) to monitor distance sensor data streams.
-
Upload test missions or manually fly while observing the distance sensor outputs in the telemetry.
-
Confirm that the flight controller reacts appropriately, for example, by maintaining altitude using the laser rangefinder data or triggering failsafe actions upon detecting nearby objects.
Benefits of LDL-T + Companion Computer + Pixhawk Integration
Integrating a laser rangefinder through a companion computer into a Pixhawk flight controller delivers several operational enhancements:
-
Improved Altitude Control: Accurate ground distance measurement leads to smoother and safer low-altitude flight.
-
Advanced Obstacle Avoidance: When combined with other sensors, the LDL-T enriches the drone’s situational awareness.
-
Enhanced Autonomous Capabilities: The companion computer enables onboard intelligence, allowing for sophisticated missions like terrain following or precision landing.
-
Adaptability to Custom Use Cases: With flexible processing and communication, the system can be tailored for diverse applications, from agriculture to inspection.
Conclusion
Bringing together the laser rangefinder LDL-T, a companion computer, and the Pixhawk flight controller provides a powerful solution for improving drone navigation and autonomy. By following this Pixhawk Integration Guide, hobbyists and professionals can unlock enhanced sensor capabilities, ensuring safer, smarter flight operations. Whether for experimental projects or commercial applications, mastering this integration contributes significantly to the evolving landscape of UAV technologies.


